Baby Birth Stats Photo Frame Laser Cut: A Thoughtful Keepsake with Practical Considerations
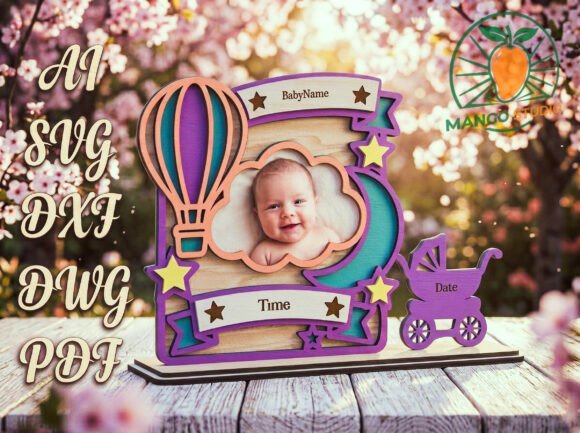
The Baby Birth Stats Photo Frame Laser Cut is more than a decorative item—it's a meaningful way to commemorate a child's arrival. This multilayered design, featuring a whimsical hot air balloon, a baby stroller, clouds, and stars, offers a personalized touch that new parents and gift-givers appreciate. With space for baby’s name, birth date, time, and a photo, it's a charming addition to baby showers, nursery decor, or as a keepsake. However, like many DIY projects, there are nuances to consider to ensure a successful and satisfying outcome.
Understanding the Baby Birth Stats Photo Frame Laser Cut
This digital design is optimized for 3 mm (1/8 inch) materials such as plywood, MDF, or acrylic. It's delivered as a ZIP archive containing AI, SVG, DXF, DWG, and PDF files, allowing for compatibility with various laser cutting and engraving machines. The multilayered design creates a 3D effect, and the vector format ensures scalability without loss of quality—making it a versatile option for creators and small businesses alike.
1. Underestimating Material Compatibility
While the design is optimized for 3 mm materials, not all 3 mm sheets are created equal. Plywood, MDF, and acrylic behave differently during laser cutting and finishing. For instance, acrylic can melt if the laser settings are too high, while MDF may char if not properly ventilated. Some users assume any 1/8-inch material will work, but the result can vary significantly in terms of detail and finish.
Better Approach: Test your laser settings on a scrap piece of your chosen material before cutting the full design. Adjust speed and power to ensure clean cuts and minimal burning. If using acrylic, consider a slower speed with lower power to avoid melting edges.
2. Rushing the Assembly Without a Plan
The multilayered nature of the Baby Birth Stats Photo Frame Laser Cut requires careful assembly. Some users jump into gluing layers together without dry-fitting first, which can lead to misalignment and frustration.
Better Approach: Lay out all pieces and stack them in order before applying any adhesive. Use small clamps or tape to hold layers in place temporarily. This allows you to make adjustments and ensures a professional-looking final product.
3. Overlooking Finishing Techniques
Many assume that once the frame is cut and assembled, it's ready to display. However, the raw edges from laser cutting—especially in wood—can look unfinished. Some skip sanding or painting, which diminishes the visual appeal.
Better Approach: Lightly sand all edges after cutting to remove any burrs or rough spots. If painting, use acrylic paints for vibrant colors and apply a sealant afterward to protect the finish. Staining wood instead of painting can also give a more natural, elegant look.
4. Misjudging the Display Space
The finished dimensions of 326 mm (width) x 242 mm (height) make this a relatively large frame. Some users don't consider where they’ll display it until after it's completed, only to find it doesn't fit the intended space or looks disproportionate.
Better Approach: Measure the display area in advance. Consider the frame's size in relation to nursery shelves, walls, or gift presentation boxes. If gifting, include assembly instructions or a small note about the final dimensions so the recipient can plan accordingly.
5. Assuming All Files Are Equal
The ZIP archive includes multiple file types (AI, SVG, DXF, DWG, PDF), but not all laser cutters or design software support every format equally. Some users download the files without checking compatibility with their machine or software, leading to import errors or incorrect scaling.
Better Approach: Confirm which file format works best with your specific laser cutter or design program. SVG is widely supported for most consumer machines like Cricut and Glowforge, while DXF or DWG may be better for industrial CNC setups. Open the file in your software before cutting to verify scaling and layer integrity.
What to Check Before Downloading or Using the Design
- Material Thickness: Ensure the design is intended for 3 mm (1/8") material and that your stock matches this precisely.
- Machine Compatibility: Confirm your laser cutter or CNC software supports the file types included (SVG, DXF, etc.).
- Layer Complexity: Review the design preview to understand how many layers are involved and whether you're comfortable assembling them.
- Required Tools: Gather wood glue, small clamps or tape, and finishing supplies before you begin assembly.
- Photo Window Size: Check the dimensions of the cloud-shaped photo opening to ensure your printed photo fits correctly.
Final Thoughts on the Baby Birth Stats Photo Frame Laser Cut
This design is a beautiful way to celebrate a new arrival, offering both personalization and creative expression. However, the success of the project hinges on understanding the materials, tools, and assembly steps involved. By avoiding common pitfalls and planning ahead, you can create a stunning, high-quality keepsake that parents will cherish for years to come.
Whether you're a hobbyist looking for a heartfelt DIY gift or a small business owner adding to your product line, the Baby Birth Stats Photo Frame Laser Cut offers great potential. Just remember: a little preparation goes a long way in ensuring your final result is as charming and professional as the design itself.